Naturally Fermented Foods
Easy & Delicious!
Stephanie Kelley
We especially need to eat more live culture foods to help our systems cope with the chemical and pesticide laden foods we regularly assault our bodies with.
Naturally fermented foods such as sauerkraut and kimchi are easy to make, but are not readily available in our local grocery stores. Commercial sauerkraut has been cooked and pasteurized, so is no longer a living food.
Kimchi is like an Asian version of sauerkraut. It consists of chopped Chinese cabbage or bok choy combined with other vegetables, garlic, ginger and spicy seasonings. It is considered the national dish in Korea, where it is eaten at every meal.
I love kimchi and sauerkraut, but had not yet personally made any until just recently. I understood it was supposed to be easy to make fermented food, after all, people have been doing it for thousands of years! Our ancestors did it in stone crocks and goat skins, so it should be a snap in a modern kitchen, right?
Well, I always like to complicate things. I figured I needed a real stone crock to make sauerkraut in, and that it would have to sit in some cool basement corner for weeks. I acquired a nice crock from Kendall at Nissen’s Market, a real antique that is quite pretty, but it is large and completely impractical for me, as it turned out.
I attempted to ferment a batch of turnip sauerkraut last year, and it just didn’t seem to work properly. I threw it out, stashed the crock, and forgot about the whole project for awhile.
But, making fermented foods was still on my to do list at some future date…and a couple of weeks ago I got serious about the project again.
A little more investigation revealed that I could use glass jars to ferment the vegetables in. This seems obvious now, but I had stoneware crocks on the brain when I first started thinking about this. I have a collection of wide mouthed jars I’ve saved over the years, as they are so useful for storage. Now, they were going to become my food laboratories!
Using jars has the added benefit of allowing one to see just what the heck is going on in there, too. If you get a little mould or scum, you can see exactly where it is. And, using smaller containers allows the vegetables to ferment faster, so you can have edible fermented food in just a few days. A caveat, though…during the summer it may be too warm to do this on your kitchen counter.
When folks still put food by, and had root cellars, it was also common to have a big crock or two of sauerkraut tucked away in the basement that could be eaten all winter long. Fermenting food was an essential preservation method.
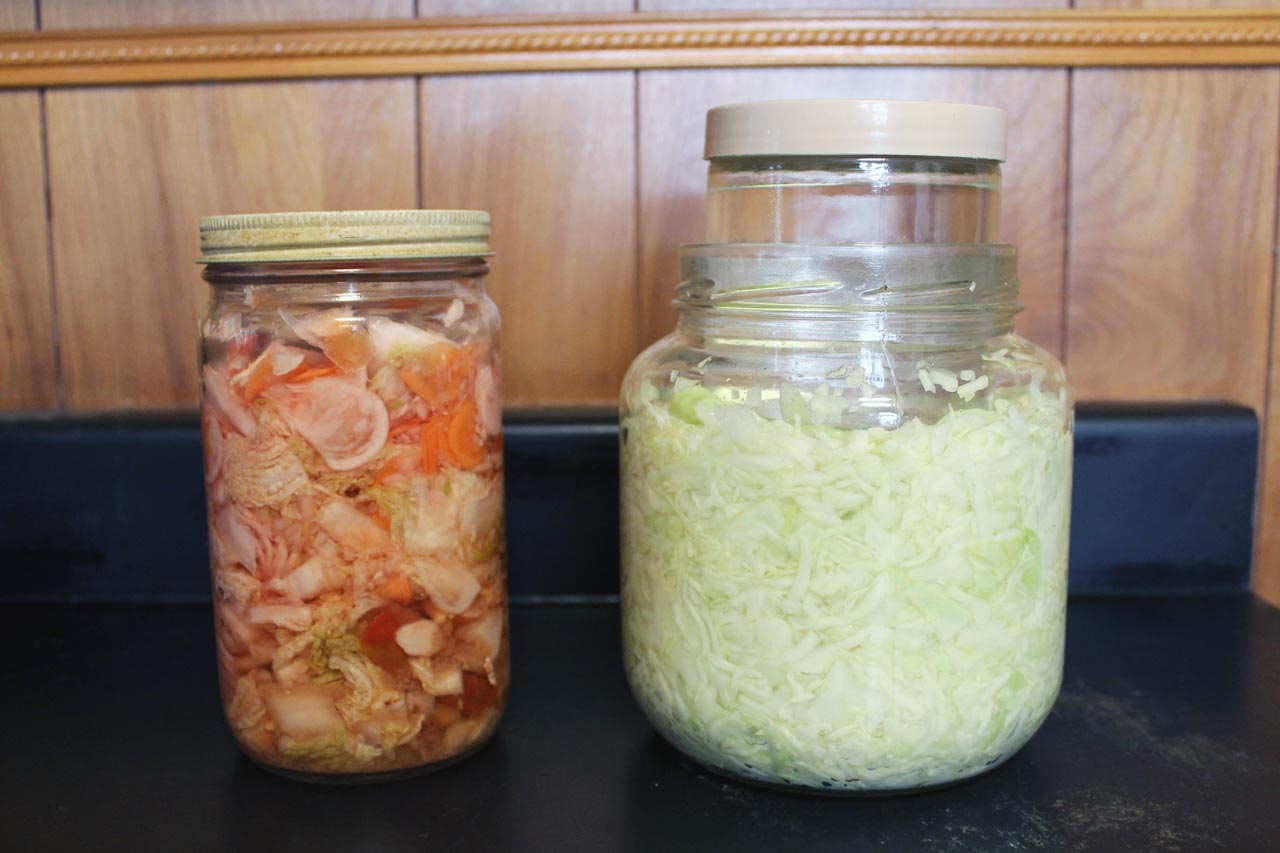
I made a batch of kimchi first. I used one head of Chinese cabbage, radishes, carrots, garlic, shallots, fresh ginger and some dried hot chilli peppers. All of the vegetables I used are readily available locally. I ended up with 2 quarts of delicious kimchi that was ready to eat within a few days, although the flavour improves the longer it ferments…up to a point, of course!
Make sure all your jars hands and utensils are clean and free of any soap residue….you only want good bacteria growing in your food!
Easy Basic Spicy Kimchi
Kosher or sea salt (available at Nissen’s Market in Perth. Don’t use iodized or pickling salt)
One large head of Chinese cabbage
12 radishes
2 carrots
1 onion (or use shallots)
Chilli peppers, fresh or dried, or cayenne to taste
1/2 bulb of garlic
3 Tbsp fresh ginger
Mix a brine of about 1 litre of filtered water and salt to taste (about 1 tablespoon). Taste as you go so you don’t over salt. The brine should be salty, yet palatable.
Coarsely chop the cabbage in 1 inch chunks or so, and thinly slice the radishes and carrots. I used my food processor for this to get nice, thin slices.
Put the vegetables to soak in the brine overnight in a large, non-reactive bowl. Cover them with a plate smaller than the diameter of the bowl so the vegetables are completely submerged in the brine. You want to get them all wilted to start the fermentation process. If you don’t have enough brine, mix a little more so you have enough to cover the vegetables.
The following day, prepare your herbs and spices. Grate the ginger and chop the garlic and onion. I pulsed this mix in the food processor. You want kind of a paste to mix in with the vegetables. You can add the chillis at this point, too, or throw them in the jars whole as you pack in the vegetables.
Drain the vegetables, reserving some of the brine. Taste the vegetables. If they taste too salty to you, you can give them a quick rinse at this point in cold water. As they ferment, though, they’ll absorb a lot of the salt taste and really mellow out, so don’t worry too much if they seem just a little too salty.
Mix the drained vegetables well with the spice paste, and then pack into clean glass jars. Wide mouth jars are much easier to work with. I used two 1 litre jars, but you could also use several smaller jars, or one half gallon sized jar.
Pack tightly and press down on the vegetables until the brine rises. If necessary, add a little of the reserved brine to submerge the vegetables. I filled 2 small Ziploc baggies with water and laid them over the vegetables in the jars to help keep them submerged.
Cover the top of the jar with a clean piece of muslin or cloth napkin fastened with a rubber band. This will keep dust and impurities out, but will allow the gases to escape as your science project ferments.
Allow nature to work its fermenting wonders in your kitchen at room temperature. Taste the kimchi every day. After about a week of fermentation, or when the mix tastes “ripe” (you’ll know the difference if you taste it every day throughout the process) put the lid on the jar and store in the fridge.
It’s fun to watch the process, too, as little bubbles are constantly rising through the veggies as they ferment. It’s kind of like having a new pet!
This recipe will keep for a couple of months, but if you like it as much as I do it won’t last that long!
Making kimchi is easy and safe, but of course if you taste or smell anything off, odd or sour, don’t eat it! Kimchi should have a bright and fresh flavour.
My batch of kimchi was good to eat within 3 days, and just kept getting better. It’s crispy and refreshing, and makes a great side dish for many foods. It is fabulous served with ethnic dishes like stir fries and curries, or with just plain brown rice.
I was so thrilled with the success of my first kimchi that I decided to take a shot at sauerkraut. I have half gallon sized jars that I’ve saved from working in restaurants, the kind that maraschino cherries or olives come in. They have wide mouths, which makes them far easier to work with.
Homemade Sauerkraut
1 medium head of green cabbage (about 3 pounds)
1 1/2 Tbsp kosher sea salt
1 tbsp caraway seeds (optional)
Clean everything, and make sure there’s no soap residue on anything. You’ll be using your hands to massage the salt into the cabbage, too.
Discard the outer leaves of the cabbage, reserving one or two leaves to cover the sauerkraut with in the jar.
Cut the cabbage into wedges and trim out the core. You can slice it crosswise very fine with a knife, or take the easy route like I did and use that darned handy slicing blade in a food processor!
Transfer the sliced cabbage into a big mixing bowl and sprinkle with the salt. Begin working the salt into the cabbage by massaging and squeezing with your hands. It may seem like not enough salt, but gradually the cabbage will become more limp and watery. This will take about 5 minutes, maybe a little more. If you’d like to flavour your sauerkraut with caraway seeds, mix them in now. (For the record, I didn’t use the caraway seeds in my first batch)
The 3 pound head of cabbage that I used ended up fitting perfectly into my half gallon sized jar. It didn’t seem like it would at first, but as it kept wilting and I kept tamping it down it filled the jar to the line you can see in the photo.
Take the cabbage by handfuls and pack it into your jar or jars. If you have a canning funnel, this will make the job easier. Every so often, tamp the cabbage down in the jar firmly. Add any liquid that was released while you massaged the cabbage into the jar, too.
If you saved a cabbage leaf, now place it over the surface of the sliced cabbage to help keep it submerged in the brine. Making sure the cabbage is covered with brine will help to keep any mould from forming.
Weigh the cabbage down. I used a smaller jar filled with water that fit inside the mouth of the larger jar to keep the sliced cabbage pressed down.
Cover the jar with a cloth held on with a rubber band. This will allow the gases to escape and keep the pet fur out. Well, over here at Chez Steph that’s an issue, anyway!
Over the next 24 hours, press down on the cabbage every so often with the smaller jar. As the cabbage releases its liquid, it will become more limp and compact and the brine will rise to cover the cabbage.
If after 24 hours the liquid has not risen above the cabbage, make a little extra brine by dissolving 1 tsp salt in 1 cup of water and adding enough to submerge the cabbage.
Now, allow the cabbage to ferment for 3 to 10 days. Start tasting it after 3 days. Because this is a small batch, it will ferment more quickly than a large batch. When the sauerkraut tastes good to you, remove the weight, screw on the lid and refrigerate. You can also allow it to ferment a little longer, there are no rules, except your own personal taste.
As it’s fermenting, you’ll see the happy little bubbles rise through the cabbage, and there may be foam or scum on the top. These are signs of healthy fermentation. The scum can be skimmed off as it forms, or just before refrigeration. If you see any mould, skim it off immediately and make sure your cabbage is fully submerged. Don’t eat mouldy parts close to the surface, but the rest of the sauerkraut is still fine.
Sauerkraut will keep for at least 2 months, and often longer in the fridge. As long as it still tastes and smells good to eat, it is.
Other kinds of cabbages make great ‘kraut, too. You can use red or napa cabbage, or mix them up for multi-coloured sauerkraut.
Fermenting food is actually so simple that it will be a snap to get a new batch on the go as I start to run low on anything so I always have home-grown live culture food in my refrigerator.
If you want more in depth information on live-culture foods, check out the book
“Wild Fermentation” by Sandor Katz. This book is a fabulous text on the magic and method of all types of fermented foods.
Bon Appetit!
